My Catalogs
Catalogs are an online service that allows systematizing information about available yarns, knitting tools, swatches, projects you are working at and stitch patterns you have created.
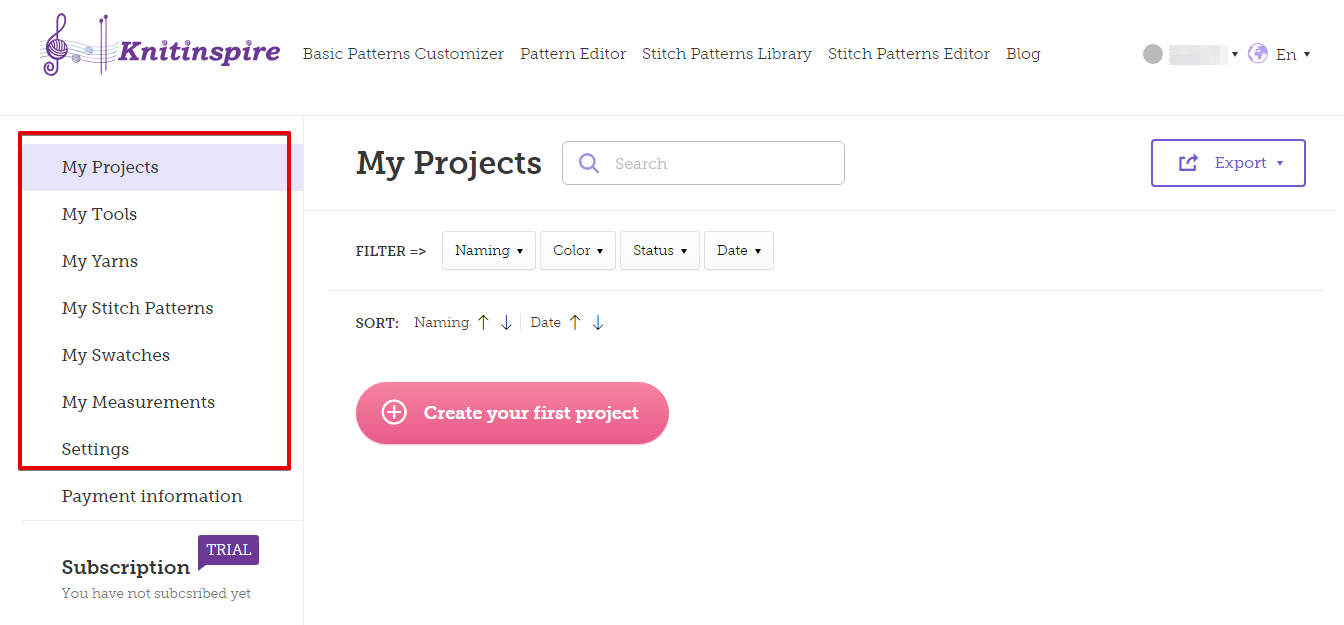
Catalogs are located in your account and have the following names (in the order of arrangement):
- The "My Projects" page is where all information about a particular project generated on the website collected. A project may contain the following: description of the article, information on the yarn, tools, swatches, stitch patterns, description of the knitting process, pictures, etc.
- The "My Tools" page is where you can create a catalog of knitting needles, crochet hooks and other knitting tools you have.
- The "My Yarns" page is where you can create a catalog of yarns you have
- The "My Stitch Patterns" page is where you can store schemes and photos of your favorite stitch patterns to use them in your projects.
- The "My Swatches" page is where you can store information on the knitting gauge of swatches, specifying the tools and yarns you have used. The swatches saved can be then used when making calculations for your projects.
- The "My Measurements" page is where you can store information about your measurements required to construct templates for their further use in the "Basic Patterns Customizer". This step allows you to avoid making corrections manually every time.
For more information about how to register on the website and get access to your account, click HERE
For more information about how to work with the "Basic Patterns Customizer", click HERE
This list is also provided in the panel on the right in your account:
Below, working with catalogs is described in more detail.
The catalog divided into three parts for the better systematization of information:
- Knitting needles
- Crochet Hooks
- Other tools
This list is provided in the panel on the right in your account:
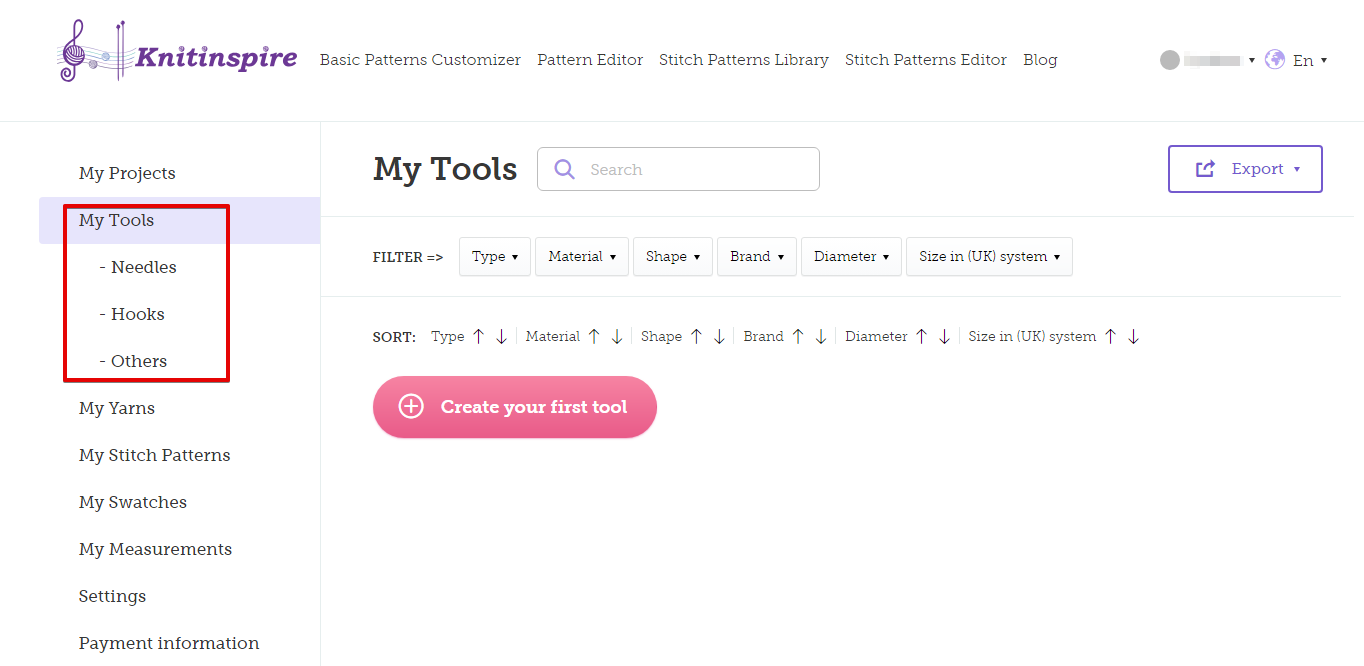
To add the first entry to the catalog, you must click "Create your first tool" (large pink button in the center of the screen).
The catalog also is also comprised of the following sections:
- The "My Tools" search is box located in the upper central part of the working window. The search box allows for context-based search (3 or more symbols) throughout all fields of the catalog.
- The "Export" button is located in the upper right part of the working window. Export allows the presentation of information in ".xlsx" and ".pdf" format documents.
- The "Add tool" button is located at the right of the "Export" button. This button opens a form in order to add a tool. When the tool category (needles, hooks, others) is changed, the form will automatically adjust, and the list of fields to be filled in. An example of the form displayed when the "needles" category added:
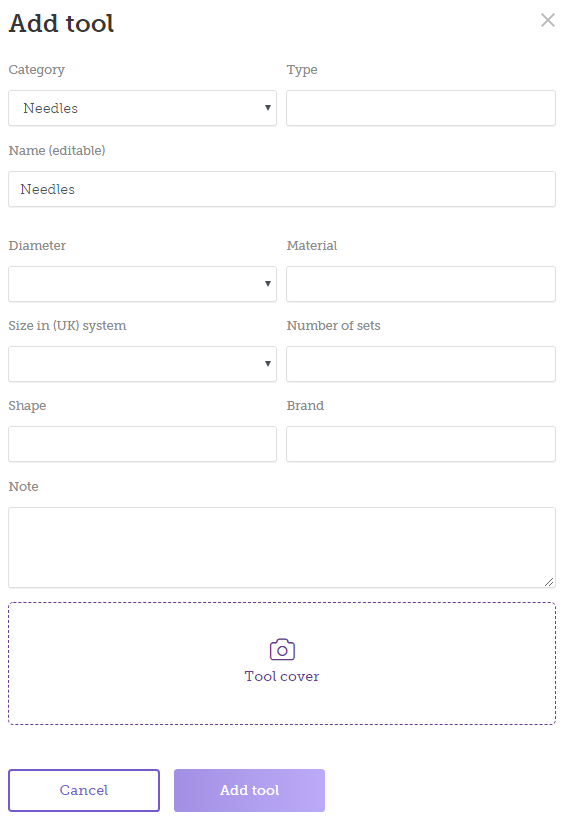
Note that the form for adding a tool contains some mandatory fields and if you have not filled in any of them, related text messages will be displayed after the "Add tool" button pressed. ATTENTION: Before add the first tool the "Add tool" button will be placed in the center of the screen (sizeable pink button).
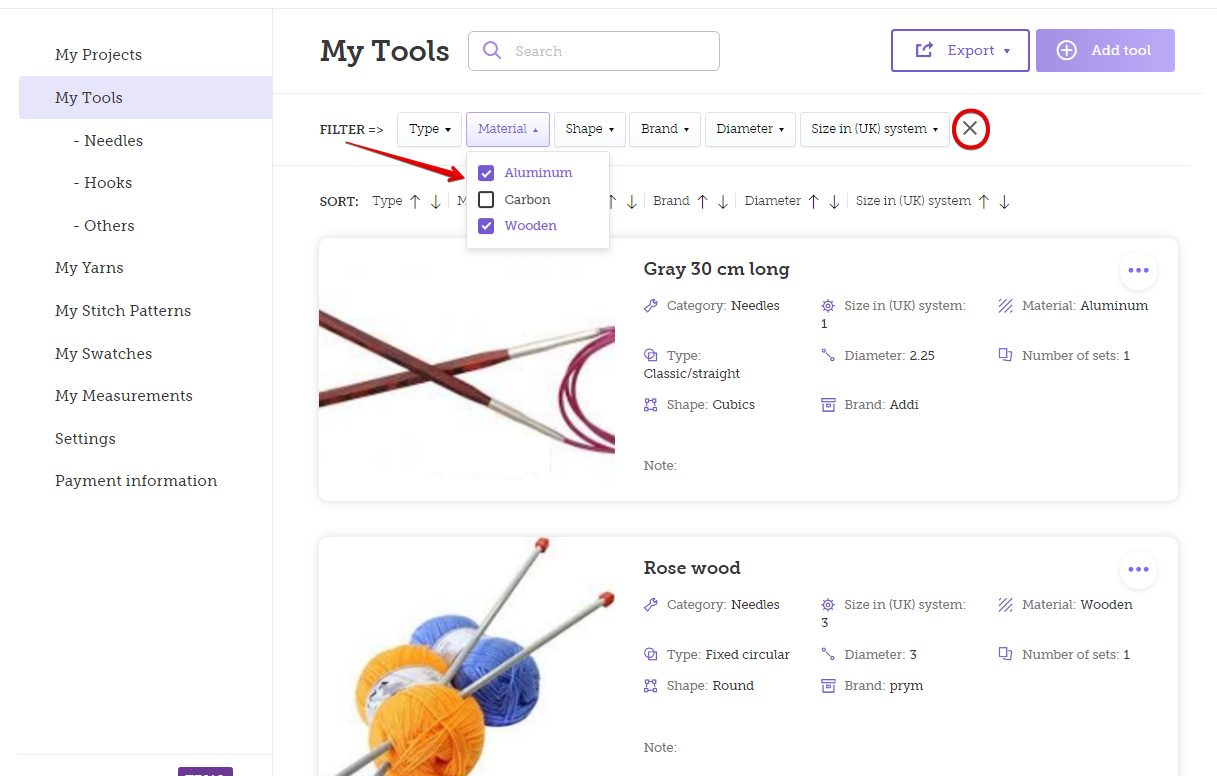
- The "Filter" is a data filtering line. It is located under the search box and contains some filtering fields that change depending on the category selected (needles, hooks, others) in the panel on the left. If the category has not been selected, the filtering line will contain fields from all three forms. When the filter category is clicked on, a list appears containing the data that the user has input when filling in the form and this will be used for further information. You can use several filtration fields and several values in the same area simultaneously. The fields used for filtration are colored light-lilac and those not used are light-gray (in the filtering line). When the filter is applied, a cross appears in the right part of the line. Click on the cross to return to the full list of the catalog.
- The "Sorting" line is for data sorting. By default, the latest input data is the first displayed in the list but you can always change the order of sorting by the selected field. The list of fields available for sorting also changes depending on the category selected (needles, hooks, others) in the panel on the left. The possibility of phased sorting is available. It is carried out by priority from left to right. You first sort the data in the first column, with the sorting arrow framed by a purple line. Then you can move to the next column for sorting, but there the sorting will already be based on the alphabetical order of the data of the first sorting column. If phased sorting is not necessary, deselect the previously used sort columns on the arrows.
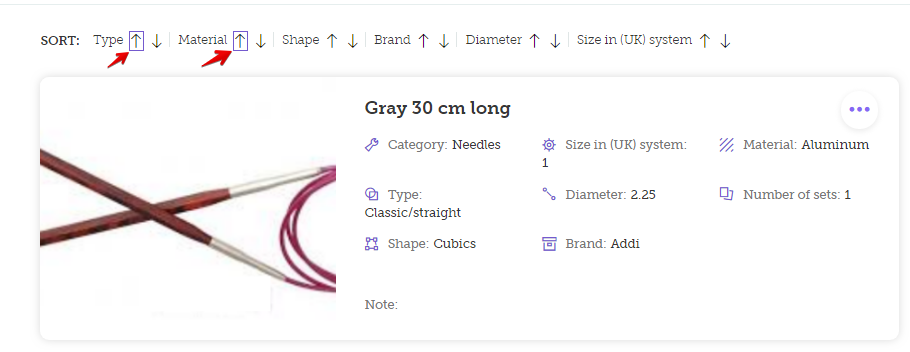
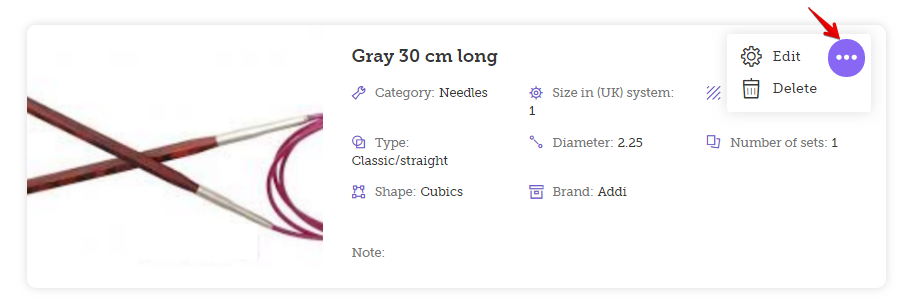
- Below the sorting panel, there is a working area with a list of the tools added to the catalog. The list is represented in the form of cards showing all the input information about tools, including their photos if they have been added. There are three dots in the upper right corner of the card. If you click on them, you will see a pop-up menu containing the following items: "Edit" and "Delete". ATTENTION: the input information about tools can then be used in projects created on the website or in "My Swatches". If a tool is attached to a project or a swatch, then the information about it cannot be edited or deleted.
Working with this catalog is identical to working with "My Tools", except for the following two items:
- The form for data input which is opened when the "Add Yarn" button is pressed, has other fields. Correspondingly, other fields are contained in the filtering and sorting lines.
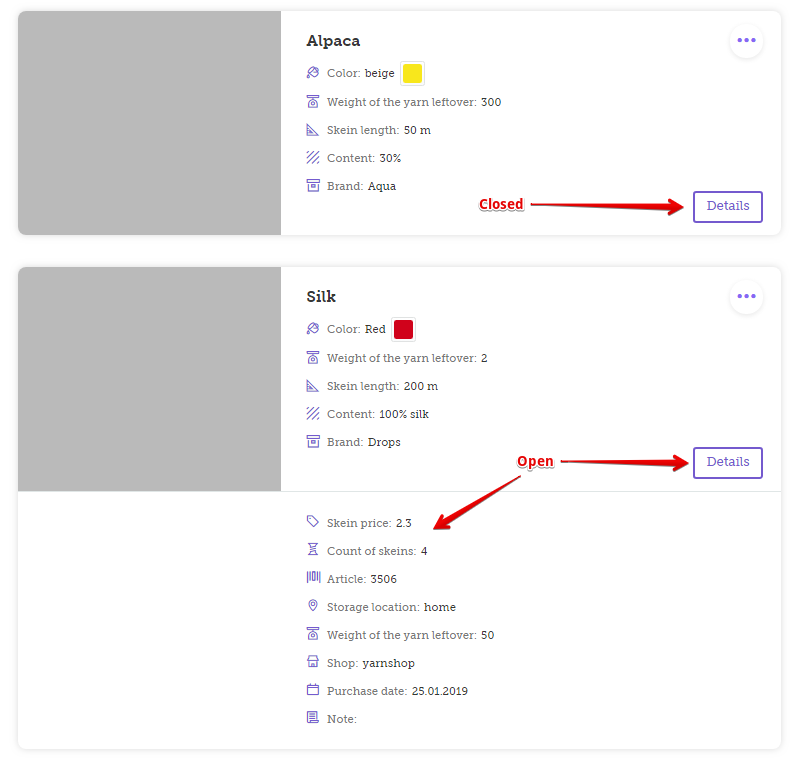
- A yarn card comprises a "Details" button which has to be pressed to see the full list of fields describing the yarn.
ATTENTION: the input information about yarns can then be used in projects created on the website or in "My Swatches". If yarn is attached to a project or a swatch, information about it cannot be edited or deleted.
In order to make calculations for a knitted article in stitches and rows, you have to know the so called knitting gauge. It can be as follows:
- vertical – shows how many rows contained in 1 cm (or inch)
- horizontal – shows how many stitches contained in 1 cm (or inch)
Read the article about swatches: how made, how to use, why it's essential (click HERE).
Working with "My Swatches" is identical to working with "My Yarns".
Since it is essential to know which yarn, tools and stitch pattern were used for a swatch, the fill-in form contains corresponding fields. You can enter values from "My Yarns", "My Tools" and "My Stitch Patterns" into the fields.
Working with this catalog differs from that for the other catalogs because adding a stitch pattern implies drawing its scheme in the "Stitch Patterns Editor".
For more information about how to work with the "Stitch Patterns Editor", click HERE
You can add a stitch pattern by clicking "Add Stitch Pattern" and pressing on the "Create Stitch Pattern" button after the fields have been filled in. All information in the form will be saved, and you will go to the "Stitch Patterns Editor" to create its scheme.
Please note that the form for creating a stitch pattern contains some mandatory fields. If you have not filled them in, you will receive related text messages after you click on "Create Stitch Pattern" button.
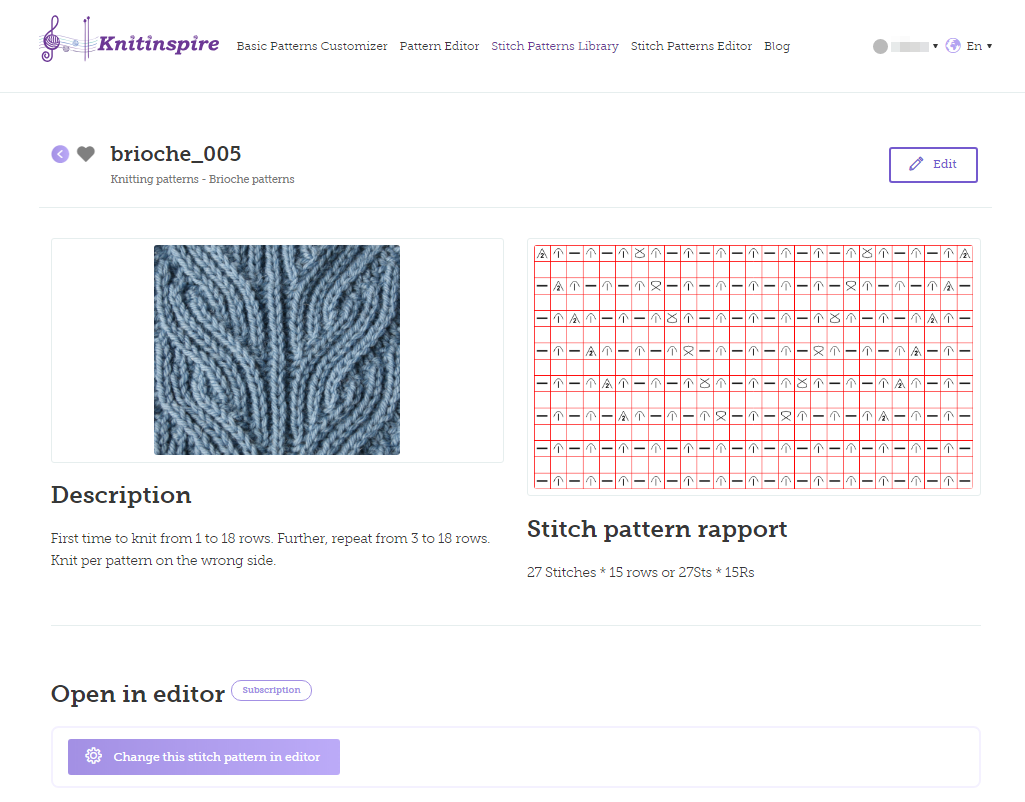
You should also note that, when creating a stitch pattern, creating a rapport – specifying a repeated part of the stitch pattern – is an indispensable condition. The size of a stitch pattern and a stitch pattern rapport are not always identical. The stitch pattern size is just a display area of the stitch pattern, you can place 1, 2, or more rapports there, add symmetry stitches and selvage stitches. Rapport is a part of the scheme that can be used later in your projects for being applied to the elements of the pattern.
Text fields of the form can be edited, just like in all other catalogs, by clicking on the three dots (upper right corner of the stitch pattern card) and selecting "Edit". If you need to modify the scheme or rapport of a stitch pattern, click on the name or photo (place for a photo) of the stitch pattern. You will see the editing window and have to click on "Change this stitch pattern in the editor" in the bottom left corner of the working window. Then, you will get to the editor where any changes can be made.
You need accurate calculations in order to create knitted clothes. They are made based on the article template. Body measurements are required to make the patterns. All measurements that can be used in the “Basic Patterns Customizer” page are described in "How to Take Measurements".
You can take measurements and add them to the “My Measurements” section. Then, the data can be used when working with “Basic Patterns Customizer”. This gives you an option to save time you would otherwise waste taking measurements every time.
In the “Category” section, select who you are going to save your data for: a woman, a man, a child or an infant. In the “Sizes” list you can find the most suitable standard size. Fields with measurement data are filled in automatically. You only have to adjust the data, if required.
You can change measurement units in the drop-down list (centimeters or inches).
The working field of “My Measurement Data” section is comprised of links to standard sizes (“Measurement Tables”) and an article about how to take measurements. Use them when you add or edit any measurement data.
Press the “Save” tab in the upper right corner of the working field to save the data.
Then, use the “Use My Measurements” button to retrieve the saved data automatically when working with “Basic Patterns Customizer”.
For more information on how to work with “Basic Patterns Customizer”, click HERE.
To see standard size data for women, men, children, and infants, click HERE.
This is the main catalog designed to store all information about the project that you intend to knit, and/or are currently knitting, or have knitted.
Here are the operations you can perform when working with a project:
- Create a project
- Add a pattern to the project
- Use the project working window
- Making calculations
- Apply a stitch pattern to the pattern
- Online knitting
- View and edit the Final Report
- Edit data
- Delete the project
A project can be displayed in two ways:
- In the form of a card containing brief data about the project. All cards are collected in the catalog where sorting, searching, filtering, exporting, editing and deleting data options are available just like when working with other catalogs. A card can be represented in a minimized form and in a maximized form where more detailed data is provided:
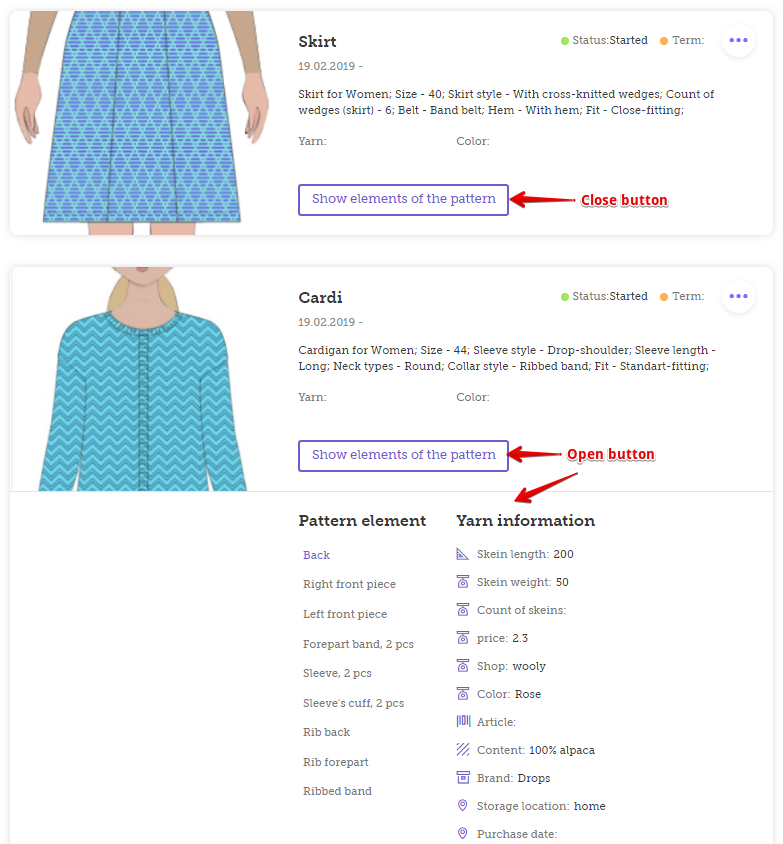
- In the form of a working window where more detailed information about it is collected and presented:

There are three ways of creating a project:
Let us consider these options separately.
- Creating a project directly from “My Projects”:
- Press the “Create project” button. If you are creating a project for the first time, the button will be located in the center of the working window. If there are already some entries in the catalog, the button will be provided in the upper right corner of the working area.
- Fill in the fields of the form that appears. You can also add a photo if available. Attention: projects cannot contain repeated names. If a project with the same name already exists, you will receive a related message.
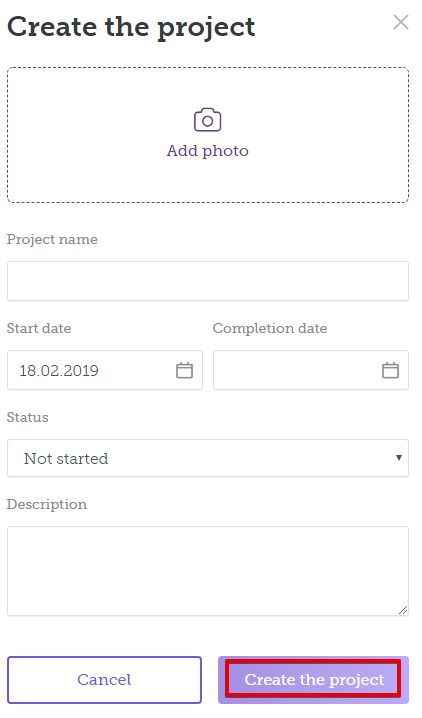
- Press the “Create the project” button in the lower right part of the pop-up form.
2. Adding a Pattern to the Project
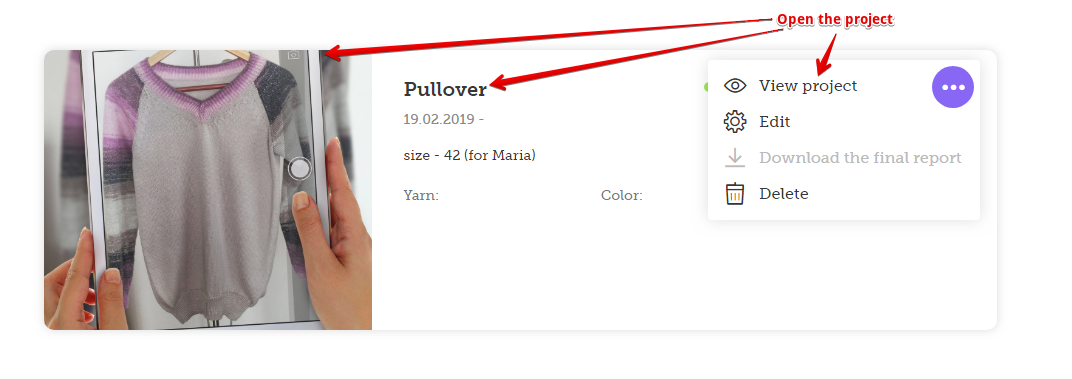
After a project has been created, you can proceed to adding a pattern to the project. To do this, press on the name of the project or its photo. You can also add a pattern by pressing the button with three dots in the upper right corner of the project card and selecting "View project".
You will have the option of using the following window to create a pattern:
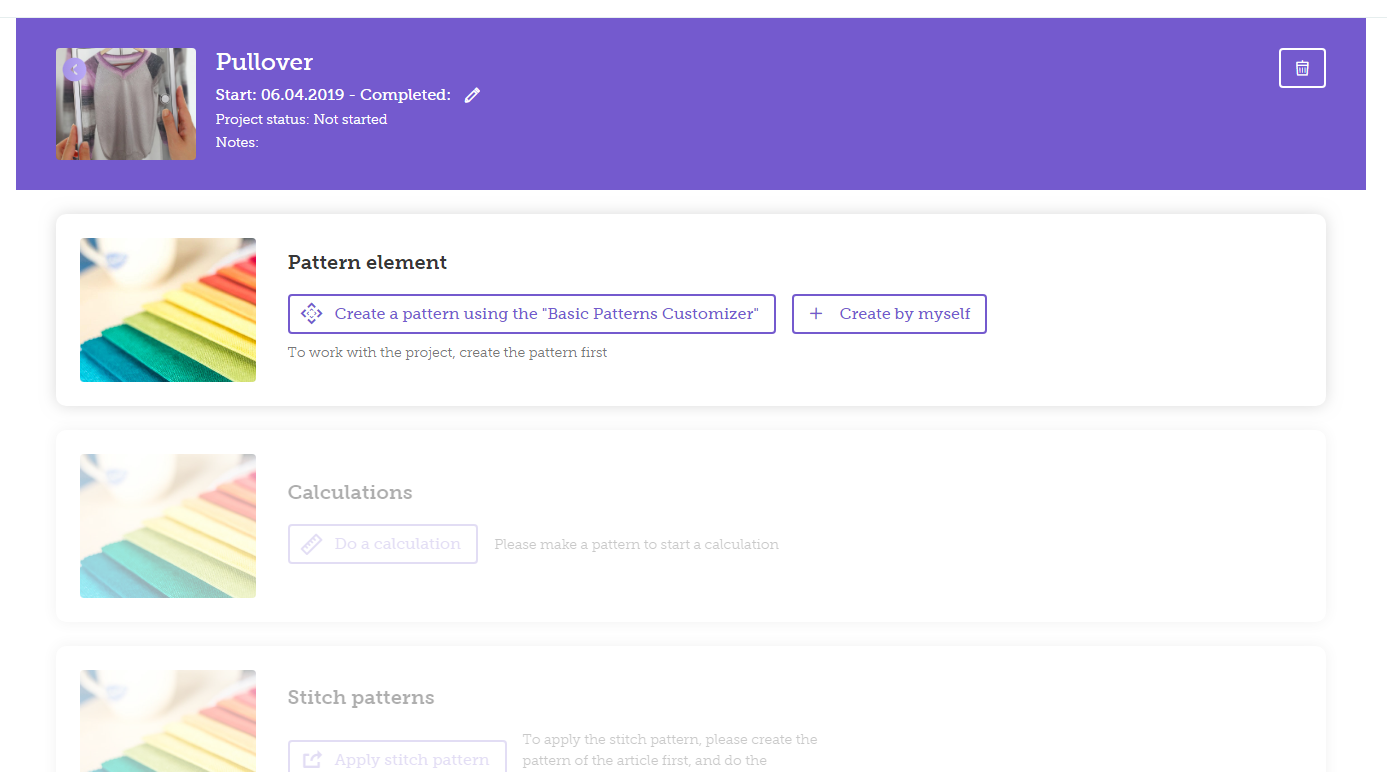
If patterns are added for the first time, there will be two active buttons in the window:
- "Create a pattern using "Basic Patterns Customizer". Press the button to select one of the prefabricated patterns your next project will be based on. For more information about the “Basic Patterns Customizer”, click HERE.
- Use the "Create by myself" tab, and press this button to get to "Pattern Editor" where you can construct the graphic patterns for all elements by yourself. For more information about the "Pattern Editor", click HERE.
If a pattern has already been created using either of the two methods described above, in the working window you will see when viewing/opening the project will look different:
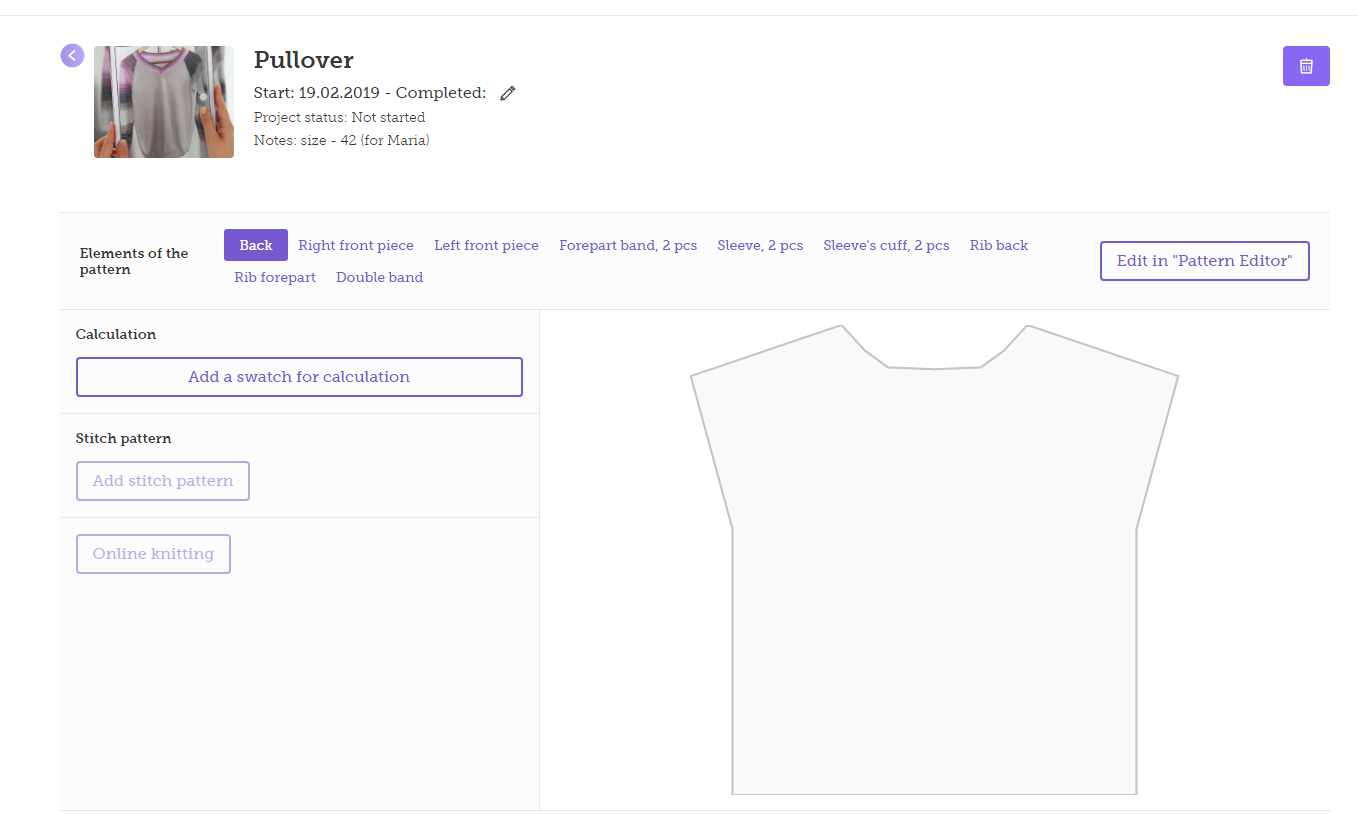
3. Using the Project Working Window
Let us consider interaction with the project working window in more detail:
- At the top of the working window there is an information panel with all the project data: its name, date of creation, etc. All the information can be edited at any time by pressing the indicator button in the form of a pencil. Here, you can also delete the project by pressing the indicator button in the form of a waste bin (at the right side of the panel).
- A panel with a list of pattern elements is located under the information panel. If you click on the name of an element, you will see its sketch below displayed with retention of measurement proportions. The same panel contains the “Edit…” button. When it is pressed, you will get to the “Pattern Editor” and will be able to edit any of the pattern elements. In the “Pattern Editor”, you can also print out prefabricated patterns of elements in full size or with 1:4 ratio. For more information about working in the “Pattern Editor” click HERE.
- Under the panel with the list of pattern elements, there is the “Add swatch for calculations” button. When the button is pressed, the data required for making calculations of the article pattern elements in stitches and rows can be filled in. The form that is opened when the button is pressed looks as follows:
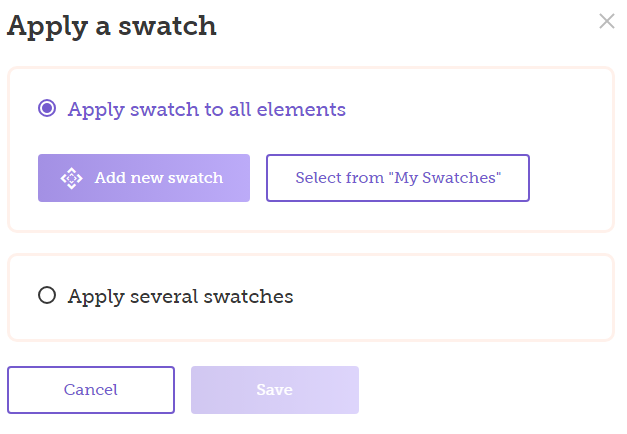
Here, you can select one (check box “Apply swatch to all elements”) or several (check box “Apply several swatches”) swatches. After selecting a swatch/swatches, press “Save” to add the data to the project.
When the first option is used, you can choose one of two buttons for data input:
- “Add new swatch”. The following will be opened after its pressing:

Note that you can save the created swatch to “My Swatches” at once by checking the “Add to My Swatches” box.
You can also use information from “My Yarns” and “My Tools” you have previously saved. The used stitch pattern from the “Stitch Patterns Library” tab or the “My Stitch Patterns” tab can be attached to your swatch. The relevant fields are highlighted in red in the figure.
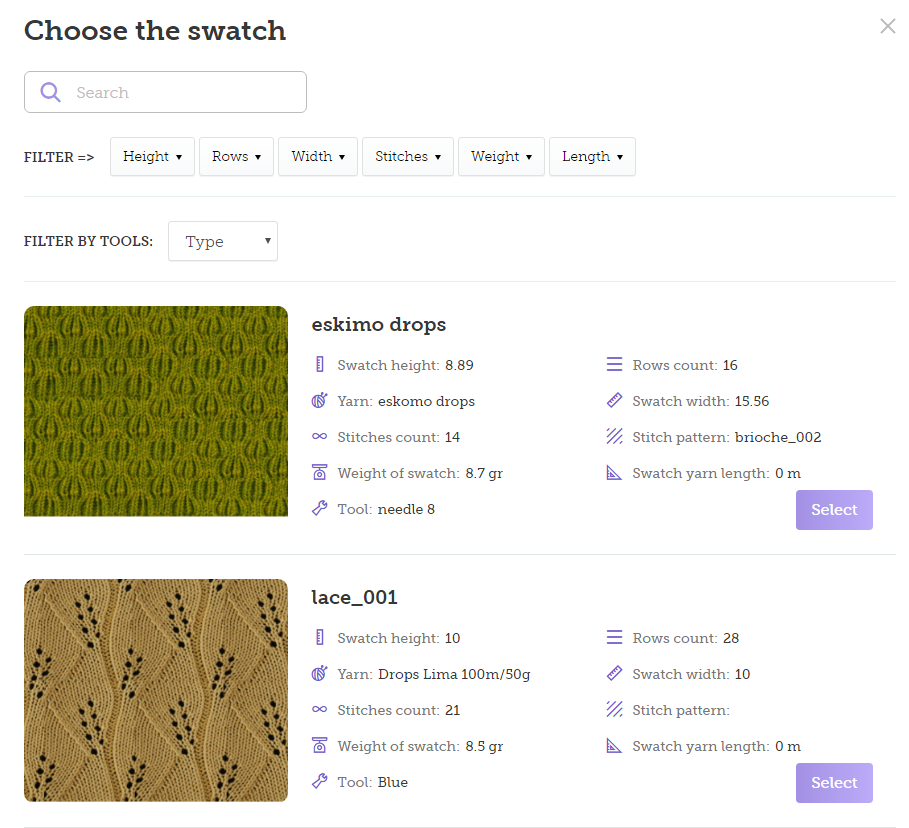
- “Select from 'My Swatches'”.When this button is pressed, a form containing a list of saved swatches will be opened.. The form comprises a search box and a filtering panel to facilitate the search of the swatch you need.
When the second option is used, another form will be opened:
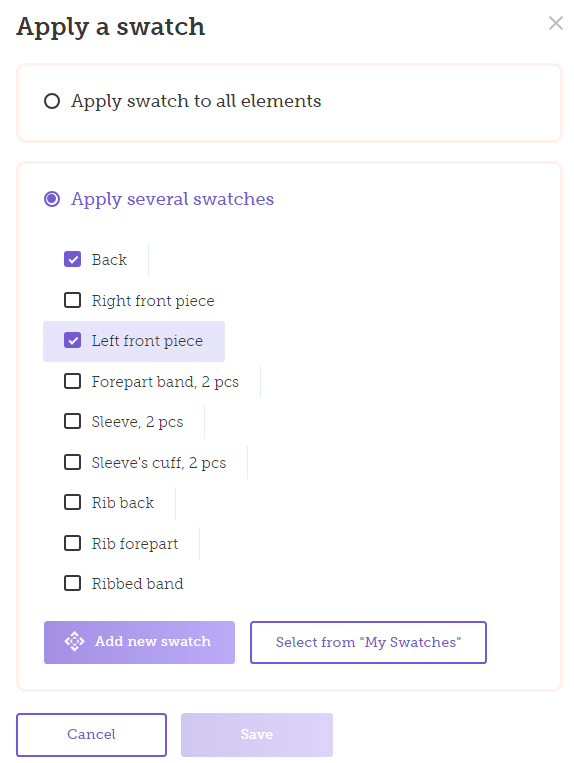
Here, you can select different swatches for different pattern elements of the article. First of all, check the boxes of all the elements which will contain the same-name swatch and then select one of two options for insertion of the swatch data: “ Add new swatch” or “Select from my swatches”.
Follow the procedure to insert swatches for all the pattern elements. After that, the “Save” button will be activated. When it is pressed, all data related to the swatch/swatches will be added to the project.
After a swatch/swatches have been selected, calculations are made automatically: the original pattern is recalculated into stitches and rows. Alongside this, text instructions are generated that will be used in the “Final Report” and in the “Online Knitting” section. Yarn consumption is also calculated in length and/or weight units. For more information about how to work with “Final Report”, click HERE. For more information about working with the “Online Knitting” service, click HERE.
5. Applying a Stitch Pattern to a Pattern
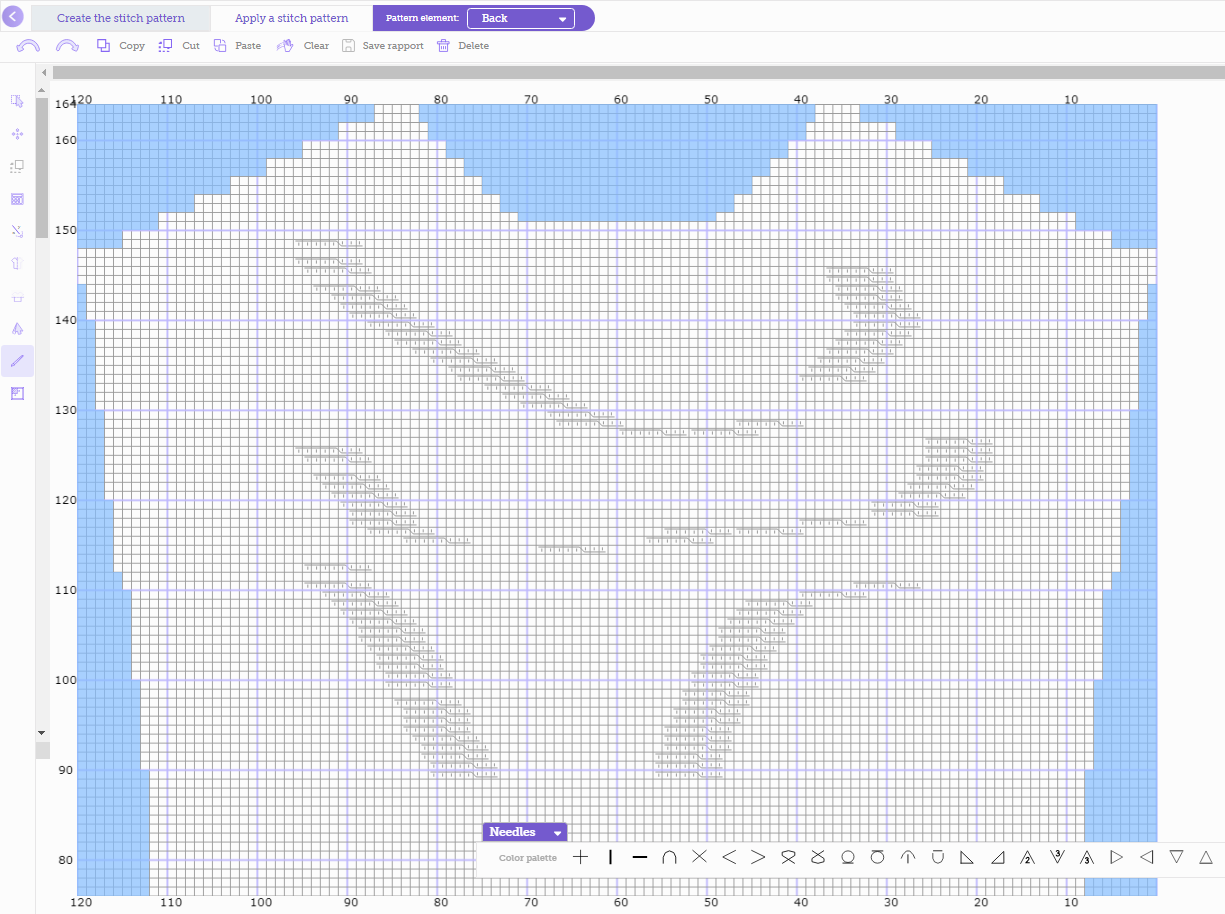
The patterns of the article elements converted into stitches and rows can be opened in the “Stitch Patterns Editor” tab by pressing the “Add Stitch Pattern” tab. It is where you can apply stitch patterns, both those created by yourself, and using “Stitch Patterns Library”, or “My Stitch Patterns” to the pattern. In the editor, all pattern elements can also be scaled, you can obtain information about the total number of rows and stitches in the element and do many other things. For more information about working with the “Stitch Patterns Editor”, click HERE.
After calculations have been made based on the swatch/ swatches, the “Online Knitting” button is activated. Select it to access the section. You can knit and obtain row-by-row knitting instructions for each element. You will see a sketch of the element on the screen. The current position of the row being knitted is shown on it as a green line. The number of the row and related text instructions are shown in the upper left corner. You can also secure a row so that you can get back to it later. In order to do this, click the red mark on the row counter. After that, the secured row will be displayed as a red line. For convenience, the panel on the left contains an increase/decrease table showing all rows where the number of stitches has to be changed. All information about moving rows during knitting will be saved (the red lines). You can simultaneously start knitting as many elements and projects as you need. You can get back to knitting at any time, even after closing your project and/or browser.

ATTENTION: if some modifications have been made to the project: a template or a swatch and/or swatches have been edited, then the data in the “Online Knitting” page will change too, because text instructions will be regenerated. In this case, the data on the current position of row counters for all template elements of the project will be reset. This should be remembered when working with a project.
7. Viewing and Editing the Final Report
Final Report is a text document that encapsulates all project-related data. It is generated automatically, but can always be adjusted manually. There is a special editor on the website for editing the report that has all necessary features for editing: adding tables, photos, formatting fonts, paragraphs, etc.
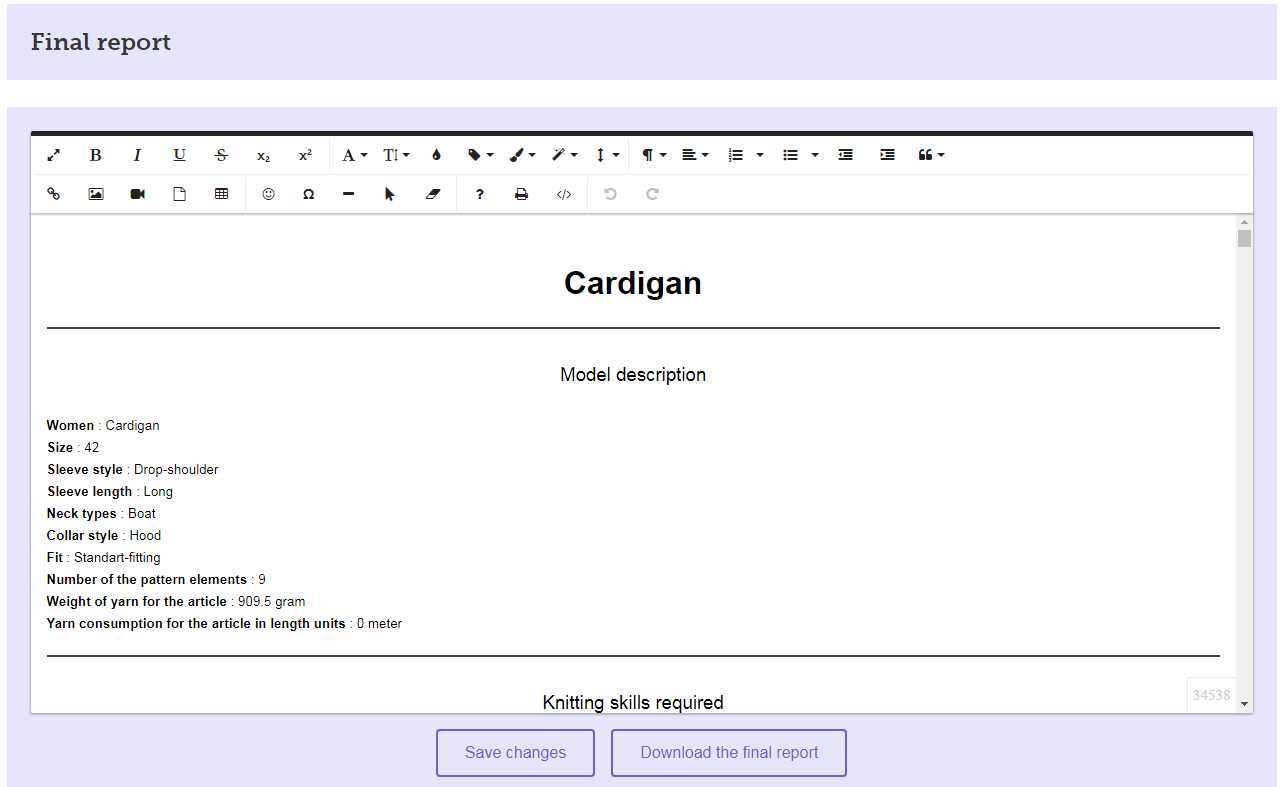
For convenience, you can maximize the report to full screen and make any corrections. For saving changes use the "Save changes" button.
You can print out the report, (the printer pictogram on the editor toolbar) or export it to PDF format, (“Download the final report” button).
ATTENTION: If some modifications have been made to the project: a pattern or a swatch and/or swatches have been edited, the final report is also changed automatically, and recalculated. This should be remembered when making corrections in the report manually.
8. Editing Data
After a project has been created, data may have to be corrected. You can do it at any time.
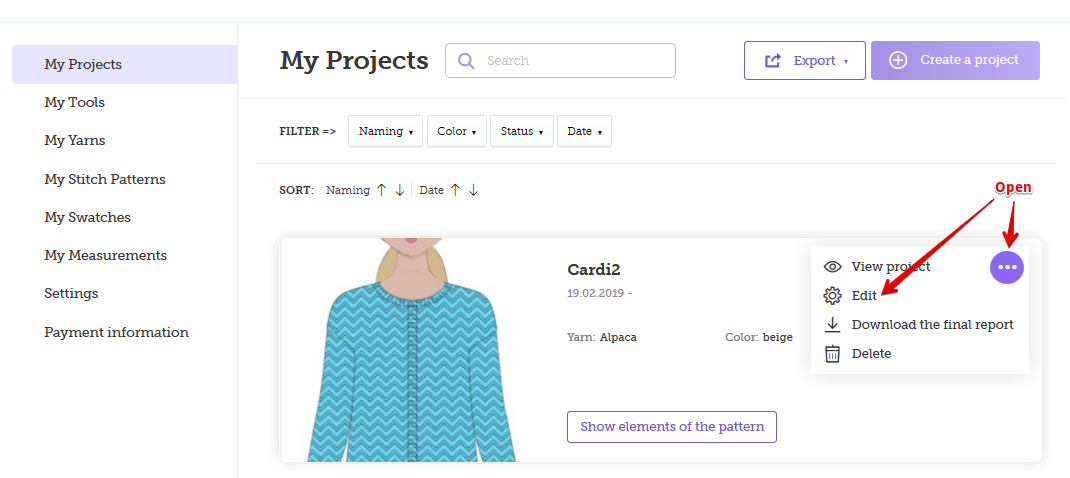
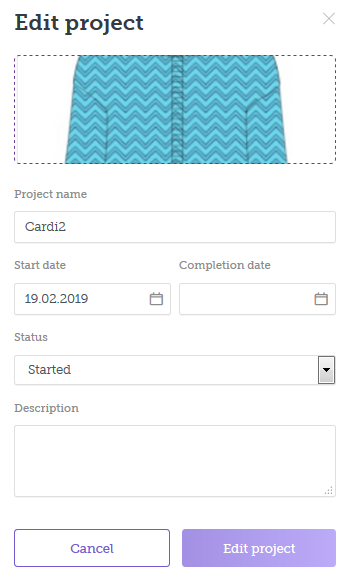
- You can edit the general information: name, project status, photo, description, start and completion dates in the “My Projects” window. Click the three dots button in the upper right corner of the card to select the project you need to edit. Select the “Edit” button in the window that appears. Then make corrections in the form that opens.
- Open the "project working window" to edit the pattern of any element of a knitted article. There is an “Edit in Pattern Editor” button in the pattern element panel on the right. Click it to get to the editor where you can make any corrections as required. After corrections have been made and saved, all calculations will be made automatically. The information in the “Final Report” and the “Online Knitting” section will be updated.
- In order to edit information about the applied swatch/swatches, click the “Use another swatch” tab. Then, you have to select the swatch/swatches as described above.
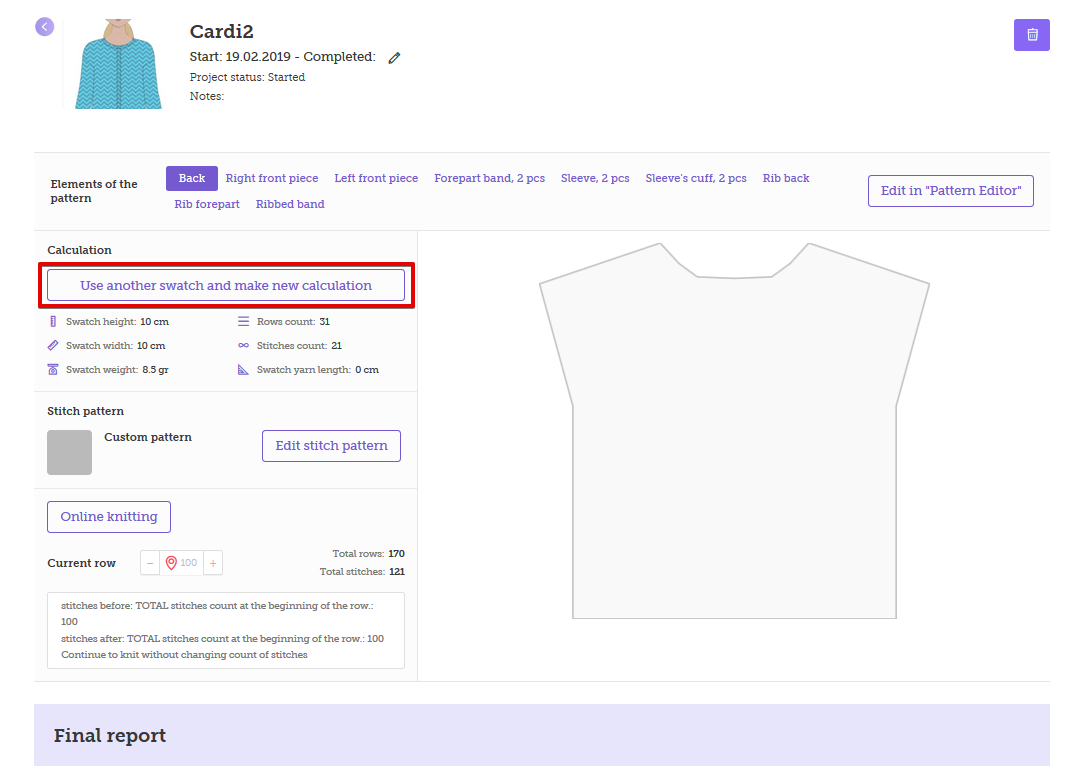
- In order to edit stitch patterns applied to pattern elements, click the “Edit stitch pattern” button in the project working window. You will find the “Stitch Patterns Editor” tab where you can adjust stitch patterns as you like. For more information about working with “Stitch Patterns Editor”, click HERE.
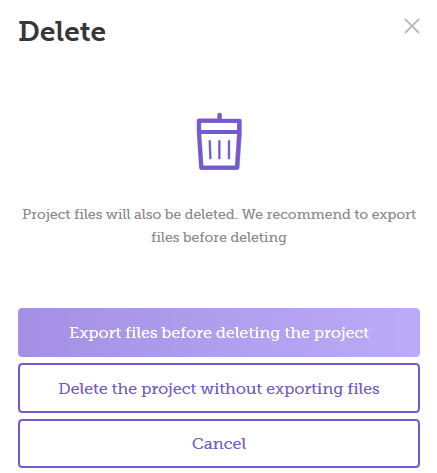
A project can be deleted in two ways:
- From “My Projects” tab you can select the project card, use the three dots button in the upper right corner of the preview. Select the “Delete” tab in the drop-down list. Select one of two methods for deleting the project: with or without data saving. When the first option is selected, the “Final Report” will be exported to your PC in the PDF format.
- From the project working window tab, by pressing the waste bin pictogram located in the upper right corner of the upper information panel.
- Open the “Pattern Editor” from the main website menu.
- Create as many elements of the article pattern as you need. Each element of the pattern must be located in a separate tab. Tabs are located in the upper left corner of the editor working window. For more information about “Pattern Editor”, click HERE.
- After all pattern elements have been created, click the “Finish editing and proceed to calculations” button. A form for creating a project will be opened. Fill in its fields and use the “Create” button to add your project.
- After the project creation form has been filled in, a form for adding a swatch will be opened. The work with the form is described above.
- After the swatch has been selected, you will be automatically referred to the “Stitch Patterns Editor”.
- After working with the “Stitch Patterns Editor” you can go to the “Online Knitting” tab. To do this, use the “Finish editing and proceed to Online Knitting” button in the lower part of the screen. For more information about “Stitch Patterns Editor”, click HERE.
- The procedure of working with the “Online Knitting” section is described above. When you’re finished with it, you can proceed to editing the “Final Report” page that will be generated automatically after adding a swatch to the project.
- You can stop working with your project at any stage as described above. After a project has been created, a related entry (“card”) will appear in the “My Projects” tab. You can continue working with the project from the catalog. To do this, click on the project name, its photo (space for the photo) or use the special three dots button in the project card.This button has a drop-down menu, select the “View project” button. After that, you will see the project working window. From the working window you can continue working with the project by selecting the corresponding option. See above for more information about the project working window.
The website is comprised of an embedded “Basic Patterns Customizer” which allows the selection of an article for knitting. Then, you can adjust its parameters. For a cardigan these include the sleeve style and length, the neckline type, collar style, etc. Then, a standard size of the article is to be selected but all measurements can be adjusted. As a result, you get patterns for all elements of the article based on which automatic calculations can be made, and a project can be created. For more information about “Basic Patterns Customizer”, click HERE.
Steps to create a project:
- Open the “Basic Patterns Customizer” tab from the main website menu.
- Select an article and adjust its parameters as described above.
- Press the “Create pattern” button which becomes active after selecting and adjusting all necessary parameters of the article.
- Then, you will see the project working window that shows all elements of the article and displays their sketches. Press their names to navigate through the list items.
- Further work with the project described above.